Thursday, August 6, 2015

Current Favorites

Hello! I hope everyone is having a good weekend so far. We are headed for a little weekend get away to the lake, so I wanted to get a post up before we left. Today I wanted to share some of my current favorites. I haven't done a monthly favorite in a few months, so instead of doing July favorites, I will just share a few of the products and things I have been loving currently. 

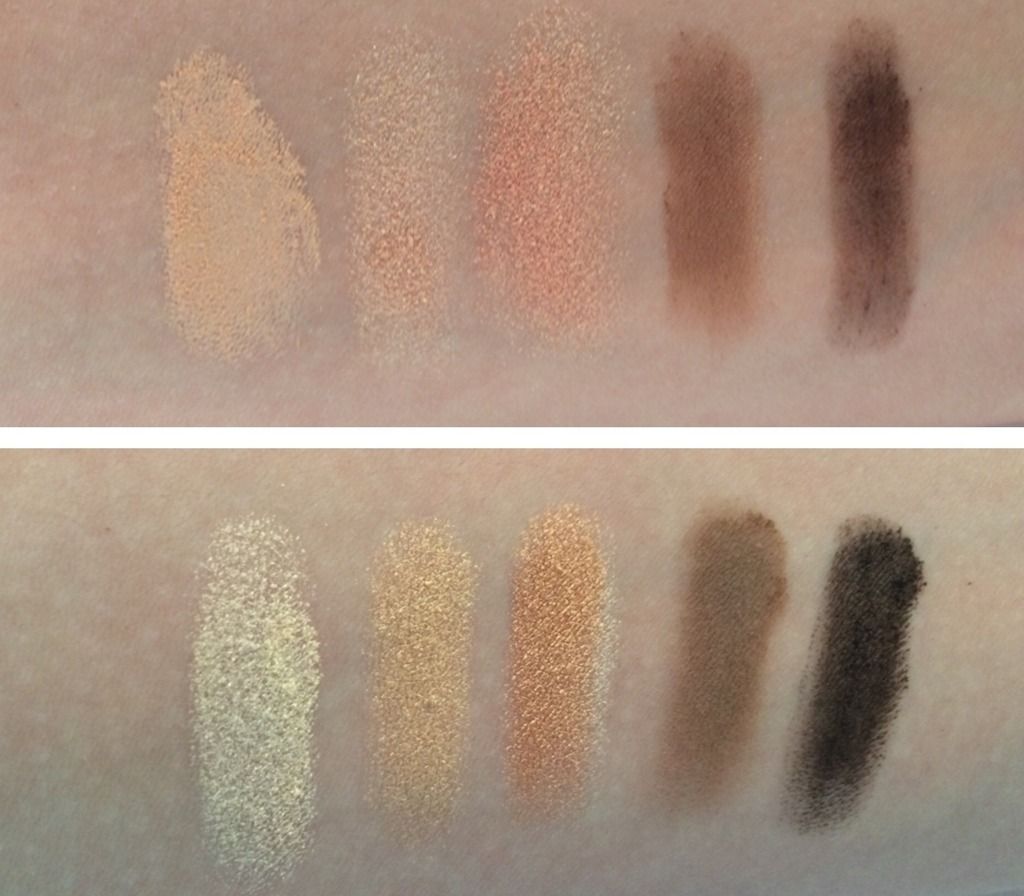
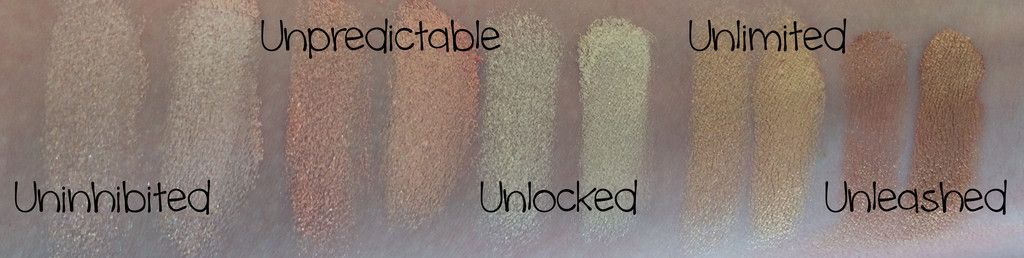
Lorac Unzipped Gold Palette- If I had to choose only one palette to use for the rest of my life, it would be this one. I absolutely love gold and bronze eyeshadow and use them on almost a daily basis.  This palette has a nice range of shimmery gold and bronze eye shadows, and 3 matte browns too. If you would like to see a full review of this palette click here.

It Cosmetics Bye Bye Under Eye Concealer- This concealer does a nice job of covering any dark circles under my eyes and any blemishes. It is a little bit on the thick and tacky side, but I think that is why it works so well. I have fair skin and had to go with the neutral medium color, so keep that in mind if you order online. 

MAC Lipstick in Velvet Teddy- If you had read my blog for any amount of time you probably know that I stick with the neutral/ mauve lipsticks. MAC describes Velvet Teddy as a deep-tone beige. Don't let the beige scare you though, it has a pink undertone and in no way makes me look like a corpse. I hate to admit it, but this was the first MAC product I have tried. I am so impressed and can't wait to pick up different colors. 

Living Proof Nourishing Styling Cream- This product is great for frizz. I have very wavy hair and the Michigan humidity is not my friend. My hair is  constantly a frizzy hot mess. While this product doesn't fix all of the frizz, it is by far the best hair product for frizz I have tried. I always apply a small amount right after I get out of the shower. If it is an exceptionally humid day, I will apply just a little bit more after my hair is dry and styled. 

It Cosmetics Airbrush Blending Brush- I didn't know what I was missing out on before I got this brush. I was using a more dense crease brush to blend out eyeshadow, but this brush makes blending eyeshadow so much easier. The brush is of good quality and is nice and fluffy. 

It Cosmetics Airbrush Blurring Foundation Brush- I was convinced that the Beauty Blender was the best way to apply foundation. This brush proved me wrong though. This brush is so soft and makes it easy to blend foundation flawlessly. I still like my Beauty Blender and still use it for concealer, but I have been loving to use this foundation brush. 

TV Show: We just finished up a series on Netflix called Jericho. This series started in 2006 and only was 2 seasons, but we really liked it. It is about a nuclear attack on major cities in the United States. 
Jericho is a small town that struggles with attacks from neighboring cities and a new government that tries to rebuild.


What are your current favorites?


Saturday, July 25, 2015

My HG Concealer

Hello! I hope everyone is having a great weekend so far. I did not mean to take so much time off of blogging, but today I am back with a concealer review. I was using the Studio Gear Hidden Agenda Concealer but the no longer sell it at Ulta. I ran out before having a chance to order it online, so I purchased the It Cosmetic Bye Bye Under Eye Concealer. I heard a couple of good things about it online, and figured it was worth a shot. This concealer is "full coverage, waterproof concealer with hydro-collagen, vitamins C&K."
It Cosmetics Bye Bye Under Eye Concealer review

Color: I have fair skin and the light color was way to light. I went with the neutral medium color and it is almost perfect for my skin. I know a lot of people like to use a lighter color under their eyes, but I prefer a color that is close to my shade.
Application: I always start by using an under eye cream just to provide the concealer with a nice base, The concealer is on the tacky side, but I don't mind it. I feel like it helps it stay put and not slide all over the place. And with this concealer, a little goes a long way! I dot the smallest amount on my finger and warm it up between my ring fingers. I apply the concealer to my under eye area, around my nose and on any blemishes. I have tried to use a beauty blender and a brush to blend it, but the heat from my finger helps it blend much better. Than I go over it with my beauty blender to blend it just a bit more. I let it sit for about 5 minutes before applying a setting powder. A setting powder is a must because the concealer has a shine to it without it. The setting powder will help the concealer last longer and will take away that shine. I don't have any issues with it creasing throughout the day, and it stays put all day without a problem.
Consistency: This concealer is thick and creamy. Because it is so thick, a small amount goes a long way.
Price: $24 dollars for .28 fl oz
I don't have terrible dark under eye circles, but they are worse than the picture shows. In the bottom picture, I applied the concealer and foundation. You can see that the concealer covers any imperfections well. This is before setting powder, so it is a little bit shiny in the picture.
Have you tried this product before? What is your favorite concealer?
Thanks for reading!

Sunday, July 5, 2015

Lorac Unzipped Gold Palette Unleashed Tutorial

Hello! I hope everyone had a great 4th. My last post I wrote a review and swatched the Lorac Unzipped Gold Palette. If you missed it, you can check it out here. Today I wanted to share the look I have been wearing the most with this palette. All of the colors are so pigmented and beautiful. I don't think I have used another palette since I purchased this one.
Lorac Unzipped Gold Palette Tutorial Bronze, Gold Look
Step 1: Apply an eyeshadow primer and sweep the lightest color, Undressed on the eyelid and in the crease. This will create a nice base for the rest of the colors and will make them easier to blend.
Step 2: Take Undeniable on an angled blending brush and lightly begin to apply it to the crease. Use a light hand to apply this color and build it up slowly. It is on the darker side and it is easy to make it too dark. I then used a fluffy blending brush to blend on the color even more.
Step 3: Apply Unleashed to the lid. This color is shimmery and has some fallout, so I use a patting motion to apply it. I used the same fluffy blending brush as before to blend Unleashed to the crease color.
Step 4: To darken the crease a bit, I used Unwind on a small crease brush and focus it on the outer 'v' and use the remaining product on the brush to blend into the crease.
Step 5. Apply Undressed to the inner corner of the eye and use an eyeliner on the upper lash line. The eyeliner I used looks black in the picture, but it is a dark brown. I like it because it is noticeable, but not as intense as a black.
Step 6: Blend Undeniable on the lower lash line and apply mascara. I have been loving Covergirls Super Size by Lashblast Mascara.
Lorac Unzipped Gold Tutorial With Unleashed, Unwind and Undressed. Bronze, Gold Look

Lorac Unzipped Gold Tutorial With Unleashed, Unwind and Undressed. Bronze, Gold Look

Lorac Unzipped Gold Tutorial With Unleashed, Unwind and Undressed. Bronze, Gold Look

Thanks for reading! I hope you like this look.

Thursday, June 25, 2015

Lorac Unzipped Gold Palette Review and Swatches

Hi There! I am so excited for today's post and to share this palette with you. I picked up the Lorac Unzipped Gold Palette from Ulta a few days ago and already love it. I had been eying the original Unzipped Palette for quite a while, but the gold shades in this one got me. Gold is my absolute favorite color to wear on my eyes. I know this palette has been out for a little while, but I haven't seen too much about it on Youtube or on many blogs. I wanted to do a quick review and swatches. I will create a couple of looks with this palette later on.
Lorac Unzipped Gold Palette
This palette has 4 matte shades {Undressed, Undeniable, Unedited, Unwind} and 6 shimmery shades {Uninhibited, Unpredictable, Unlimited, Unleashed, Unafraid}All of these shades are beautiful and highly pigmented. I was honestly surprised by how well the colors blended together. I have the Lorac Pro 2 Palette and find it hard to blend the colors, especially the matte shades. These eyeshadows must be formulated differently, because I didn't have an issue with them.  This palette also comes with a mini Behind the Scenes Eyeshadow Primer.
Lorac Unzipped Gold Palette Swatches
 This palette has a nice blend of gold tone. Unpredictable {top, middle} is more of a rose gold and Unleashed has a more bronze undertone {bottom, middle} The only thing I wish this palette had was a lighter brown/tan shade. Its not a big deal because I can use a color from a different palette I have, but all of the brown shades are on the darker side. Unafraid {bottom, right} looks like it is matte, but there is a slight shimmer to it.
Lorac Unzipped Gold wet dry swatches
These shadows can be worn dry or wet. I did a side by side of the dry colors {left} and when they were wet {right} The picture doesn't really do them justice. When wet, these shadows were quite a bit more intense. When using them wet I never stick my wet brush directly into the palette, but I would spray a bit of water or Mac Fix Plus on my brush after putting the shadow on it.
I have been applying these shadows on top of my Urban Decay Primer Potion and they last for a good part of the day. I only retouch it a little bit if I am going out at night.

If you have tried this palette or the original, what are your thoughts?
I hope you enjoyed this post. Thanks for reading!
{Don't forget to follow me on Twitter or Instagram to see looks using this palette}

Saturday, June 20, 2015

How to Prevent Frizzy Hair

Hello and Happy Saturday! I wanted to get a quick post up before we head to a wedding. We have a lot going on with family in town. It has been so hot and humid here the past couple weeks that I finally had to break down a do something about it. I wrote a post on some tips and trick to preventing frizzy hair here. This post I wanted to focus on a specific product that I like to use.
A while ago I got a decent sized sample of Living Proof Nourishing Styling Cream from an Ipsy bag. I used it daily and remember liking how it made my hair look and feel.  I never got around to purchasing a full sized bottle though. I finally purchased it because I couldn't handle spending time to curl my hair to have it frizz as soon as I step outside anymore.
Living Proof Nourishing Styling Cream Review
Pros:
  • It helps fight frizz for the whole day
  •  Smooths and softens hair
  • It is lightweight and doesn't make hair greasy
  • Only a small amount is needed.
Cons:
  • It is pricey for a small bottle.
  • If too much is used it can weigh hair down. 
I use this product right when I get out of the shower and scrunch about 2 pea-sized amount in my hair from my ears down then let it air dry. On most days I curl my hair and will add a very small amount more once my hair is dried and styled. I will gently rub it in my hair from my ears down, and will apply any extra on the top of my head to help with fly-aways.

 Over the years I have tried countless products to help prevent frizz and to lock in styles. This is by far the best product I have used. There are times when it is so humid out that it doesn't work as well, but my hair still looks better than before. I haven't used it long enough to decide for sure, but it may be a HG product.
Thanks for reading!

Tuesday, June 9, 2015

Weekend Style #1

Hello! I hope everyone is having a great week so far. Yesterday was our last day of school. While it is a relief to be done, I know that I am going to miss it and all of the kids. I have a couple of leads for a teaching job for next year, so I am hoping for one of those. But, on a positive note, there is a few weeks before summer school starts, so I am dedicating that time to getting up as many posts as I can on the blog.
This past weekend was full of good friends, late nights and goodbyes. A couple of our friends are moving because of a job, so we spend Sunday celebrating with them. This is the outfit I wore. I normally don't where tank tops (or shorts) because I am always cold. It was  finally warm enough to wear it comfortably.
Candies Floral Lace Top- Kohls
Paris Blue's Capri's-
Sperry's- DSW
Monet Necklace- JcPenney

Thanks for reading! 


Tuesday, June 2, 2015

Beauty Products Worth the Hype

Hello! Today I wanted to share some of my favorite products that are worth the hype.
Beauty products worth the hype
1. Urban Decay Eyeshadow Primer Potion- I have tried other eyeshadow primers, and this one is the best I have tried by far. My skin is fairly oily, and my eyeshadow always seems to crease mid-day. This primer helps my shadow last the entire day with no creasing.
2. The Beauty Blender- The Beauty Blender gives a flawless airbrush finish to foundation. The egg shape makes it easy to blend undereye concealer as well. I have tried other makeup sponges, but this one is the softest and easiest to blend foundation.
3. Colour Pop Lippies- Colour Pop has amazing lippie stixs and lip liners. I own 2 colors of both the lippie stick and liner and they  are both nice and creamy. I normally use the lip liner all over my lips and it lasts for quite a while. Even after most of the product has worn off, it leaves a nice tint. The best part is their lip products are only $5 each.
4. Anastasia Dipbrow Pomade- I finally tried this product after hearing so much about it on Youtube and I love the way it makes my eyebrows look. It defines them nicely, without being too dark or looking drawn on. After application, it stays put all day.
5. Clinique Dramatically Different Moisturizing Gel- As I mentioned before, I have fairly oily skin. This gel is the perfect moisturizer for summer because it moisturizes just enough without being too oily. It absorbs quickly into the skin and gives my face a nice base for foundation.
6. They're Real Mascara- I got a small sample of this mascara from Sephora and it separates and defines lashes perfectly. It is easy to use without clumping and gives a lot of volume.
7. Tarte Amazonian Clay Blushes- Before trying these, I didn't think there could be much of a difference in blushes. I got one to try on a whim and I am so glad I did. These blushes are very pigmented and blend nicely on the skin. These are the longest lasting blushes I have every tried.
8. Revlon Kissable Balm Stain- Although these stains can be drying, they leave a long lasting tint to the lips. I always make sure to apply a lip balm underneath them. Honey is my all time favorite lip product.
9. Urban Decay Naked 3 Palette- If I could pick only one eyeshadow palette to use, it would be this one. There are the perfect amount of rose-toned shimmery and matte shades. There are so many different looks that can be created with this palette that can be worn daily.
10. Clarisonic- There is a noticeable different when i use the Clarisonic and when I don't with how my skin looks. It helps clean the skin better than just using your hands. I only use it every other day because it can dry the skin out when used too much. I like to use it with the First Aid Beauty cleanser.
What makeup is worth the hype to you?

Friday, May 29, 2015

Summer Makeup Essentials

Hello! I hope everyone had a good week. Schools is almost done, so the kids are very hyper and anxious for summer. Today I wanted to share a few of my favorite makeup products for summer.

Summer Makeup Essentials

Face- I like to keep my face makeup lighter in the summer. BB Creams are a nice way to give your face a light coverage. These BB Creams also have SPF in it which is nice if you are going to be out in the sun for a short time. I would use a heavier sun screen though if you are planning on being outside longer.
I also like to use a nice highlighter, especially in the summer. I lean more towards matte foundations and using a highlighter to give a nice glow. The one pictured is the Betty Lou-Manizer by The Balm. Lastly, for blush my favorite color to use is coral. It looks especially nice with a little bit of a tan.
Eyes- I like to keep my eye nice and bright with a simple eye look. When I am not using a neutral color, I like to wear gold and bronze tones on my lids. I normally use a brown gel eyeliner to line my top lid because it is less harsh than black. The gel eyeliner by Maybelline is my favorite one to use. Using an inner corner highlight and a white or tan eyeliner on the bottom water line will brighten your eyes and make them pop.
Lips- Coral makeup screams summer to me. The coral lipstick pictured is called Coral Blossom by Tarte. I have also been loving this light, bubble gum pink balm by Revlon. It is one of the Colorbursh Matte Balms in the color Elusive.
Nails- Lastly, I wanted to include a few nail polish colors. Summer is the perfect time to wear bright, colorful polishes. These are the Neon Collection by China Glaze. If you would like to see a post with some nail polish ideas for summer let me know in the comment section.

What are your summer makeup favorites?
Thanks for reading!


Tuesday, May 19, 2015

Tips to Clearer Skin- How I Cleared my Skin

Hello! It has been such a long time since my last post. Even though life has been pretty busy, I am trying my best to get posts up more frequently. I am trying to get a schedule down with planned posts so if there are any post recommendations please let me know in the comment section. Today I wanted to share a few tips to clearer skin. My skin has never been too bad, but most of the time it wasn't completely clear either. I always seemed to have a small breakout on my forehead.
Tips for clearer skin
1. Find a face cleanser that works for your skin. I have tried quite a few cleansers over the years and I had issues with many of them drying my face out. Or, they would work for a while and my skin would clear up, then they would stop working as well for me. Right now, I am on my second tube of First Aid Beauty's Face Cleanser and it works really well for my skin. I did a full review of this product here. It is a gentle cleanser which makes it nice to use for both day and night.
2. Use a good moisturizer. My skin is quite oily, so using a night moisturizer is something that I often neglected. For the day time, I use a light, oil-free moisturizer from the brand Simple, and for night, I use First Aid Beauty's Ultra Repair Cream. I can see a noticeable difference when I use a night time moisturizer and when I don't.
3. Clear skin starts from within. Make sure to watch what you eat and to drink lots water. Water provides moisture and helps the body eliminate toxins. I have been trying my best to drink more water and less pop. Hopefully I can completely quite drinking pop, but I'm not quite there yet.
4. Clean your makeup brushes weekly. I am not the best at this, but  I have been trying to clean my makeup brushes more often. I also make sure to clean my beauty blender daily. Brushes hold on to old makeup and bacteria which can lead to breakouts.
5. Protect your skin and use sunscreen whenever you plan on going outside.

I know that there are many other ways to help clear up your skin, but these are the things that I have been doing and seeing benefits from. I try to keep my routine simple and not use too many products. Every once in a while I will use a facial mask, but it isn't something I regularly use. The products I mentioned are what is working for my skin at the moment. I went through a lot of trial and error with products though, so my advice is to try things until you find something that works. Don't try too many new products in a short time though because it may take your skin a few weeks to adjust.

What are your best skin care tips?

Thanks for reading!


Monday, May 4, 2015

Covergirl Super Size by Lashblast Mascara and Covergirl Intensify Me Eyeliner Review

Hello! I hope everyone had a great weekend! My was a pretty laid back one for the most part. We went to see the Avengers Friday night, which was pretty good. We had a magnitude 4.2 earthquake on Saturday which was completely unexpected and weird. We don't typically have them in Michigan, so this was the first time we felt one. Today I wanted to share a couple things I received from Influenster by Covergirl.
I got The Super Size Mascara by Lashblast and the Intensify Me! Liquid Eyeliner by Lashblast. I was excited to try these products out, because Lashblast is my favorite drugstore mascara I have ever tried.
Covergirl super size by lashblash mascara, covergilr intensify me eyeliner review

The Mascara comes in a nice packaging. The tube is quite a bit thicker than a lot of other mascaras and the wand is long and skinny. The wand is made with some shorter bristles to deliver maximum mascara, and longer bristles to comb through the lashes. To apply the directions say to start at the base of your lashes and twirl or rotate the wand as you go.
I was completely impressed with the way this mascara made my lashes look. I have fairly long lashes and go for a mascara that volumizes over lengthens and this mascara gives an incredible amount of volume and a bit of length. It separates the lashes nicely, but if you are not careful, it can clump. When that happens though, I just run the wand through my lashes a couple more times and it works them out. 2 coats of this mascara, then I am good to go. If you are looking for a mascara that is on the natural side, then this one is not for you, but if you are looking for a more dramatic mascara, I would recommend trying this one out.
The Intensify Me Liquid Eyeliner also has a nice packaging. It has a grip where you are suppose to hold the product when applying it. The felt tip is flat but wide, so it gives you control of the thickness of the application. While I didn't mind using this product, I am more of a gel eyeliner gal. I like the more matte look of the gel, and I feel like I have more control of the application. I am not as comfortable applying the liquid eyeliner, so it was a little sloppy the first few times I tried it. To fix it up though, I used a matte black eye shadow with an angled eyeliner brush to go over it. Not only does that fix up any minor mistake I have made with the liquid eyeliner, but it helps the eyeliner stay on longer. It also makes the liner more matte, which I like. I think that this would be a good product to try if you like liquid eyeliners, although it might be difficult to do a cat eye with it. I probably won't purchase this one after I am done.
I hope these reviews were helpful. If you received these in a Voxbox, what did you think of the products?
Thanks for reading!
post signature

Wednesday, April 22, 2015

How to be a Best Friend to your Spouse

Hello! I have been planning on writing this post for at least a month now.  But recently, I read a post that someone wrote about how their spouse is not their best friend. She had some valid points and explained that she had a girlfriend to get pedicures with and gossip about work and life with. I couldn't help but disagree though. My husband is my best friend and has been since we started dating.  He is the person I want to spend time with and talk to (I bet he would get a pedicure with me too if I asked:) )  I have had girlfriends before who have hurt me deeply, but I know my husbands intent is sincere. Today I wanted to share some of the ways we continue to stay best friends after years of marriage.
How to be a best friend to your spouse

1. Communicate. One of my favorite things to do is just sit and talk with my husband. It can be easy to get caught up in the busyness of day to day life and not really talk to your spouse. Ask them about how their day went and whatever is going on in their/your life.
2. Never stop dating. It is important to make time to spend with each other. Laugh and have fun together. Get dressed up and go out on a date. Maybe take turns planning a date to go on and have it be a surprise.
3). Motivate and support each other. Encourage your spouse to achieve their goals. There were times when I wanted to quit school, but my husband pushed me to continue and get it done.
4. Trust: Be open and honest with your spouse.
5. Be there for each other. That doesn't mean only through the good times, because things will get tough sometimes. Use the tough times to make your relationship stronger and use it to grow closer together.
6.  Respect each other. I can't tell you how many times I have seen people post negative things about their spouse on Facebook. Or, they will say things about, or to their spouse that they would never say about anyone else. Sometimes it is easiest to hurt the people we are closest to by the things we say and do. Make it a priority to respect each other.
7. Listen. Really listen to your spouse when you have a conversation and take interest in the things they are saying. There is something therapeutic about talking about issues with others. Even if you can't help solve their problem, it sometimes helps just having someone there.
8. Never give up on them. You should be their biggest fan and they should be yours.

How do you stay best friends with your spouse?
Thanks for reading.
post signature


Monday, April 13, 2015

Empties Part 2

Hello! I hope everyone had a great weekend. It was tough to go back to work today after having a week off for Spring Break. Today I wanted to share my second post of empties. My last post was makeup empties, but this one has more skin and hair care.
Dove Dry Shampoo- I have gone through numerous cans of this dry shampoo. I go back and forth using this one and one by Suave. I like this because it has a nice fresh scent that isn't too strong. It does leave white residue in my hair if I spray too close, but I am sure to hold it away and brush the excess out.
Simple Sensitive Hydrating Light Moisturizer- This moisturizer is perfect for oily-combination skin. I like that it is light and seems to absorb into my skin quickly. I have a different moisturizer I use in the winter because it isn't moisturizing enough for the colder months. I did repurchase it, but the one with SPF in it. I probably wouldn't recommend this if you have dry skin.
Clarisonic Refreshing Gel Cleanser- I am thinking about doing a full review on this product with my Clarisonic. But, this is a trial size that came with my Clarisonic and I did repurchase a full size version. I liked it and feel like it helped clear my skin up, but I am currently using a different wash.
Essie 3-in-1 Glaze- I love this product! My polish normally lasts a few days longer when I use this as a top coat. You can't tell from the picture, but this bottle is over half full. Unfortunately it got very thick and too goopy to apply. We don't have central air, and our house got very hot this past summer. I am hoping that's why it got too thick. I did purchase another one and keep it in a cooler spot hoping I have better luck with this one.
Paul Mitchell Spring Loaded Detangling Shampoo- This is another trial size, but I ended up buying a full size version of this. I was excited to use a Zero Frizz, Zero Sulfate shampoo because they are less harsh than other shampoos. At first, I really liked how this made my hair feel after washing it. Over time though, I felt that my hair wasn't getting as clean as it should. I started using this one every other time I washed my hair, and using a different shampoo on the other days. I probably won't repurchase.
I hope you like this post.
Thanks for reading!
post signature

Monday, April 6, 2015

Makeup Empties- Part 1

Hello! I hope everyone is having a great week so far. I am on spring break this week, so I should have a couple more blog posts up this week. Today I wanted to share some of my empties. I always enjoy reading these because they are a mini review on many products. I will have another empties post up soon with some skincare, haircare and a couple other things.

Loreal Lash Out Butterfly Mascara- This mascara does a nice job lengthening and the brush is designed to evenly apply mascara to the outer lashes too. I liked this mascara, but I prefer mascara that volumizes over lengthens. If you are looking for a lengthening mascara, I would recommend this one, but I probably won't be repurchasing this one.
Maybelline Colossal Volume Express Mascara- This mascara also lengthens more than it adds volume. While I thought the formula for this mascara was decent, I will not be repurchasing it.
Studio Gear Hidden Agenda Concealer- This is the best concealer I have tried for under eye circles. This concealer blends nicely and covers dark circles well. I sometimes use it on blemishes, but I don't think it is the best for that. If you would like to see a full review of this product, click here.
Maybelline Eyestudio Gel Eyeliner- I used this product daily for months and like the formula. It glides on nicely and lasts all day long. I haven't had an issue with it drying out after using it for a little while. If you are looking for a good gel eyeliner, I would recommend this one. I have already repurchased this product.
Neutrogena Nourising Eyeliner- I have repurchased this eyeliner a few times. It comes in a few different colors, but I have only used the Spiced Chocolate color. I am sure they have black and a plum color as well. It glides on nicely and lasts for most of the day. I haven't repurchased it since I ran out this time, because I have been just using eyeshadow on my lower lash line. I am sure I will pick up this product again though.
Covergirl Outlast 3-in-1 foundation- I have talked about this foundation on my blog so many times, but I figured I would add it again, just in case you are new to my blog. This is my absolute favorite foundation. It is a medium coverage, so it looks more on the natural side when applied with a beauty blender. I use the color 810, and it matches fairly well. They have a wide selection of colors too. My skin is oily-combination and this works well for my skin type.

Thanks for reading!!

post signature

Tuesday, March 24, 2015

Tips for Thrift Shopping

Hello! I hope everyone is having a great week so far. Before my internship last semester, I was in need of more professional clothes I could wear. I bought a few things from the stores, but didn't have hundreds of dollars to get a nice variety of items. My mom and I went to the local thrift store just to see what they had. I was surprised by some of the items I found. I got a couple of shirts from Express, Old Navy and a few other brand name items. I was able to get quite a few shirts for a few dollars a piece. It does take a little bit of time to look through things, but I feel like it is worth it. Today I wanted to share a few tips I use when I thrift shop. It can be overwhelming when there are isles and isles of clothes and it can be tough to find a place to start.
Thrift shopping tips
1. Decide what you are looking for. Are you looking for casual clothes or items for work. Sweaters, short sleeves, tank tops etc.
2. Have particular colors in mind. The local thrift store around me has things organized by type of clothes and color. So if I am looking for a blue sweater, I can easily locate all of the blue sweaters. It makes it easier to start with a few of my favorite colors and look through other colors later on if their is time.
3. Look for things you would pick up in a store. I know that if I wouldn't pick up something in a store, I most likely would not wear the item and it turns into wasted closet space.
4. Try things on. Make sure the item fits well and that there are no stains or holes. There is no use buying things that will just sit in the closet because they don't fit well.
5. If you can sew/ alter clothes, don't be afraid to buy things that may need altering. I am learning to sew and have done a couple of basic alterations to shirts. The nice thing is if I mess up, it was only a few dollars wasted.
6. Have fun! Try on clothes that you wouldn't normally pick up- you might end up liking it.

Do you have any tips for thrift shopping?
Thanks for reading!
post signature

Wednesday, March 18, 2015

First Aid Beauty Product Review: Lip Therapy and Eye Cream

Hello! I hope everyone's week is going great. A couple of weeks ago I reviewed a few of my favorite face products from First Aid Beauty. Check out that post here. I got a kit of 5 products around the holidays and these two product were in it. Unfortunately, they no longer have the kit I bought, but they do sell these products separately and they do offer a couple different kits.
Eye Duty Triple Remedy- This product is supposed to instantly brighten, depuff and smooth. It claims to be safe for sensitive skin. I was excited to try this product out, and I have been impressed
with it. I don't normally have any puffiness under my eyes, but I do have dark circles. This product
doesn't have coverage like a concealer, but it does help to mask some of the darkness. It blends nicely
into the skin and smooths. It also slightly brightens the area and I can notice a difference on the days I don't use it.
Packaging- The packaging of this eye cream is really nice. It comes with a squeeze tube, but the end has a metal applicator. The applicator is nice and cooling and is supposed to help with puffiness.  
Price- $36 for 10 ml

Ultra Repair Lip Therapy- This products claims to repair dry lips and is petroleum free. I normally will only use this lip product in the morning and at night. I use a different one during the day. I notice a big difference when I use FABs Lip Therapy. Normally during the winter months my lips get extremely dry and start to crack because of the cold weather and the wind. My lips still get dry when I am not consistently using this product, but my lips have not cracked once since using it. Often times I do wear lip products that tend to be more on the dry side, but this product saved them. Sometime I will use this product underneath lipsticks and liners to give some extra moisture underneath.
Consistency- This product is a bit on the thick side, but it feels nice and moisturizing on the lips. 
Finish- There is no color, but it is glossy, but nothing over the top. 
Price- $12 at Sephora for .5 fl oz. 

I would recommend either of these products. They work great and do what they claim to do.
Thanks for reading.
post signature

Monday, March 9, 2015

10 Marriage Tips for a Happy Marriage

Hello there! My husband and I will celebrate our 5th anniversary this year. Today I wanted to share some of the things we have learned along the way. These are 10 things we try to do every day to keep our marriage happy and strong.
10 marriage tips for a happy marriage

1. Don't go to bed angry. I always find that if we don't resolve an issue, it will come up again, and usually worse. It can be tough, but we try to work through any argument before going to bed. It is actually in the bible: "In your anger do not sin: Do not let the sun go down while you are still angry" Ephesians 4:26
2. On that same note, we talk and walk through any problems we may be having. If we let it bottle up instead, it has the potential to become a bigger problem.
3. Intentionally spend time together. Sometimes it's easy to get into the routine of daily life. We set aside time to go on dates, or just have a night in watching a movie. 
4. Do things your spouse enjoys doing. He will go shopping with me, I will watch sports with him. Its a good way for us to spend time together, and it is nice when he take interest in the things I enjoy and vice versa.
5) Be honest. It's not worth it being dishonest in a relationship- the truth will eventually come out.
6) Compliment your spouse. 
7) Learn the others love language. There are 5 different love languages- Words of affirmation, receiving gifts, physical touch, quality time, acts of service. Your spouses love language is ways they feel the most loved.
8) Make decisions together. If there is a big decision to make- or even a small one, talk about it with your spouse.
9) Plan for your future. What are your hopes for the year? for the next few years?
10) Motivate each other to go after goals.

What is your best marriage tip?
Thanks for reading!
post signature

Tuesday, March 3, 2015

Urban Decay Primer Potion VS.Too Faced Shadow Insurance

Hello! I hope everyone had a great weekend. Eyeshadow is my favorite part of makeup to do. I enjoy trying new colors and trying out different ways to put them together. It is always irritating when my eyeshadow creases midday and just looks messy. One way to help prevent creasing is to use an eyeshadow primer. I have used a few, but today I wanted to do a review on Two Face Shadow Insurance and Urban Decay Eyeshadow Primer.
Eye shadow primer urban decay primer potion, too faced shadow insurance
Consistency: Shadow Insurance has a thinner formula while Primer Potion is a bit thicker and takes a few seconds longer to make sure that it is blended well. Both look natural on the skin once blended in.

Color: I own the original colors for both brands, which is a light beige/skin color. Both brands have other options for colors including a champagne color for both, a glitter glue for Too Faced and an anti-aging formula for Urban Decay. Both primers help make the eye shadows more vibrant.

Formula: I have been using Shadow Insurance for quite a while now, but recently tried a sample for the Primer Potion. I have used the Primer Potion before, but forgot how well it works. I have oily-combination skin, which means my eyeshadow doesn't stay put for long without a primer. The Shadow Insurances works okay, but I find that my eyeshadow will usually crease about midday. But with the Primer Potion, my shadow lasts all day and into the night. 

Packaging: Both packaging's come with a screw top and squeeze bottle. I don't find that either one are messy or have any complaints for either. 

Price: The original formula for both brands sells for $20. You do get slightly more product with Urban Decay's. Too Faced Shadow Insurance is .35 fl oz and Urban Decay's Primer Potion is .37 fl oz.

I would recommend Urban Decay's Primer Potion to anyone looking for a good primer. I find it more effective than Too Faced Shadow Insurance for skin that is more on the oily side.

What is your favorite eyeshadow primer?
Thanks for reading!
post signature


Friday, February 27, 2015

NOTD Essie Chinchilly

Hello! I am so glad the weekend is finally here. Last week I had an interview for a paraprofessional position with one of the local schools. I was excited, but nervous. While shopping for an outfit to wear, I stopped to take a look at the nail polishes. I had been wanting a gray for a little while, and when I saw Chinchilly, I thought it could work for the interview too.  That same day I had my interview I got a call that I got the job! I can't wait to get started next week.
Essie Chinchilly Nail Polish
 Chinchilly is a classic gray, with a hint of purple undertone. It is a gorgeous color that is perfect for the office. The only issue that I had with it is that is very sheer. The first time I wore it, it took 4 coats to have a nice, even application. I did wear it a second time and put a more opaque polish underneath to give it a base. I ended up needing 3 coats of Chinchilly on top of it, so the base didn't work as well as I had hoped.
Since I had to use 4 coats of polish, I didn't put a top coat on it. I didn't want to make the polish even thicker on my nail. I will definitely be using a top coat next time though because it only lasted a couple of days without one. 
Overall, I really like this color, I just wish it was more opaque, but I can deal with it.

Do you have a favorite gray nail polish?
Thanks for reading!

post signature

Monday, February 23, 2015

First Aid Beauty Face Product Review

Hello there! Around Christmas time I purchased a Kit of 5 First Aid Beauty Products. I heard that the products worked really well, especially for sensitive skin, so I figured I would give them a try. Today I am going to review 3 of the products: Face Cleanser, Facial Radiance Pads and Ultra Repair Cream. They don't sell the same kit that I have, but they do have a kit with the 3 products I am going to review at Sephora.
 My skin is normally combination-oily, but during the winter months it is very dehydrated and the couple of products I was using was not enough for my skin. The product I was most excited about was the Ultra Repair Cream.
First Aid Beauty Face Product Review Ultra repair cream, facial radiance pads and face cleanser
Ultra Repair Cream- "Intense therapy, skin protectant with FAB antioxidant booster. Hydrate dry, parched skin, relieve minor irritation and itching due to eczema and other conditions. For the face and elsewhere." I typically use this only on my face right after using the cleanser. It is a thick cream, but it absorbs quickly so it doesn't leave a greasy feeling like some thick moisturizers. Since it is on the thicker side, I only use it before bed, not under my makeup. This has helped my skin so much and I no longer have any dry or flaky skin. It is fragrance-free so it doesn't have much of a smell to it, which is nice. My husband has used it on his eczema and finds that it helps with that. It is going to take me a while to use the whole tub, but I do plan on repurchasing it.

Facial Radiance Pads- These are suppose to exfoliate, tone and brighten. They are alcohol-free and can be used once or twice daily.  One side of the pad has a texture to it to exfoliate, while the other side is smooth. I don't know that they are strong enough to exfoliate well. I didn't notice a huge difference when I used these, but I only used them once a day instead of twice. It might work well for some, but I don't think that these would be worth purchasing again.

Face Cleanser- "Removes surface oils, make-up, dirt and grime. Safe for sensitive skin. Face Cleanser is an airy cream that gently cleanses the skin. The formula is infused with a blend of botanical antioxidants to stave off abuse of the elements. It is well suited for anyone with sensitive skin." This is a creamy cleanser that lathers nicely. It is gentle, but still works well. I normally use it with my Clarisonic to help exfoliate my skin. I doesn't break me out or dry my skin out too much.

I hope you found these reviews helpful. I have 2 more products from First Aid Beauty, so I will probably do a review with those two soon.
Have you tried any First Aid Beauty Products?
Thanks for reading!
post signature


Friday, February 20, 2015

Beauty Blender vs. Real Techniques Miracle Complextion Sponge

Hello! Finally it is the weekend and today we had another snow day. It has been very cold here with extremely cold wind chill. I hope it is warmer where you are! I recently purchased a Miracle Complexion Sponge from Real Techniques because it was about time to replace my Beauty Blender. I have heard quite a few good things about the Miracle Complexion Sponge and have heard it is a good alternative to the Beauty Blender, and is possibly even a dupe.
Before switching to the Beauty Blender, I was using a sponge by Sonia Kashuk. If you are interested in seeing that comparison, click here.
Beauty Blender Vs. Real technique miracle complexion sponge
Price- Lets first talk about the price difference, because that is the first noticeable difference. The Beauty Blender is $19.95 at Sephora, while the Real Technique Sponge is $5.99 at Ulta. A lot of times, the Real Techniques brand will on sale for buy one get one 50% off too.
Shape- The Beauty Blender is in the shape of a tear drop, making it easy to use the larger side for foundation, and the smaller end for concealer and around the eyes and nose. The Real Techniques Sponge is a similar shape, but one side is flat. It's also easy to use the flat end to blend foundation, and the other end is also smaller for applying concealer.
Texture- both sponges expand when wet. The Beautyblender is softer while the Real Techniques sponge stays more firm even when wet.
Application- I do feel like I get a similar end result from both sponges. 
Overall- While I think the Real Technique Sponge it a nice alternative to the Beauty Blender, I do like the Beauty Blender more. Since it is softer, it is easy to bounce and roll  on the skin to get a perfect application. I feel like I have to work a little bit harder to get a similar application with the Real Technique sponge. If you have the money to splurge on a Beautyblender, I would say go for that, but if not, the real techniques is a great alternative.

Have you tried the Real Techniques Miracle Complexion Sponge?
Thanks for reading!
post signature