Saturday, December 28, 2013

12 Beauty Favorites in 2013

I can't believe 2013 is almost over. I wanted to share some of my favorite beauty products for this year. I have talked about many of these already on my blog, but they are worth mentioning again.


1. Covergirl Outlast Stay Fabulous 3-in-1 foundation- I use the color 820. This is my favorite liquid foundation. It has a medium coverage that leaves a nice matte finish. It lasts for a good 8 hours and it comes in a pump bottle which makes it easy to use.
2. Revlon Just Bitten Kissable Balm Stain in Honey Deuce- I am on my second tube of this product. I absolutely love the color. It is a natural looking color, but it can be darkened with a couple of layers. It can be drying, but chapstick on top helps.
3. Revlon Just Bitten Kissable Balm Stain in Romantic- This is the first red lip product I have tried and I can't believe I waited so long to try one. This one is nice because it is fairly sheer when you first put it on. The color becomes more bold with a couple of layers though.
4. Taylor Swift Wonderstruck Enchanted Perfume- I just got a second bottle of this perfume. Its hard to describe the scent, but it does smell sweet. I like this one better than the original Wonderstruck.
5. Essie Nail Polish in Bahama Mama- This is a lovely maroon colored polish that has been a favorite of mine this winter.
6. Orly Nail Polish in Halo- I have been accenting my ring finger with this gold, glitterly nail polish. I have really been liking chunky glitter, especially for the winter.
7. Maybelline Colossal Volume Express Mascara- I think I may have found my new favorite mascara. For years I have been using Covergirl's Lashblast. I got this one on sale on figured it was time to try a new mascara and I am so glad that I did. This lengthens lashes and makes them look incredible with a couple of layers.
8. Covergirl and Olay Simply Ageless Concealer- This concealer is great for under eye circles. It covers discoloration and blend nicely into skin.
9. Neutrogena Nourishing Eyeliner- I use the brown color on my bottom lash line. It blends nicely for a smokey look and stays put all day without running or smudging.
10. Maybelline Color Tattoo Metal in Barely Branded- I have a few of the Color Tattoo and they look nice on their own or under eyeshadow as a base. Barely Branded is a beige color that makes light eyeshadow colors pop.
11. Urban Decay's Naked 3- I got this palette only a couple of weeks ago, but I already love it. The colors are rose-toned and aren't like any other colors that I have. They are all so pretty and warm toned.
12. Suave Professional Dry Shampoo- If you have never tried a dry shampoo, I highly recommend that you do. The second day after washing my hair I spray this at the roots and it soaks up any oil and freshens my hair. It also adds volume which is nice.

I also wanted to do a quick recap of the year. It has been crazy with so many memories.
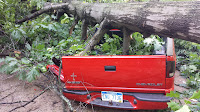
  • I started blogging. This has been an awesome experience so far. I can't wait to see where 2014 takes it.
  • We went to the East Coast for the first time. New York was on my bucketlist of places to go, so I'm glad that we finally did. 
  • 3 huge 80ft trees fell in our driveway unfortunately landing on my husbands truck.  
  • My husband and I bought our first house.  We have had a lot of fun making it our own. 
  • Our second niece was born. Just a few weeks ago. 
  • After years of convincing, my hubby finally enrolled in college. yay!
What are your favorite products for the year.
Thanks for visiting!

Friday, December 27, 2013

Kinds of Makeup Foundation

Hello!
Finding a foundation that not only matches well in color, but also one that that works well with your skin type can be a challenge. Not all kinds of foundation work will all skin types. The time of year should also be considered when choosing a foundation. Lighter foundations are good in the summer when skin tends to be more oily because of the heat and humidity. During the winter skin tends to be more dry and a different foundation may be needed.  I know for me I have a hard time finding a product that doesn't make my skin look oily after a couple hours. 
  
Revlon Colorstay
Liquid Foundation:  There are so many different options for liquid foundation. There are ones for dry/normal skin and other that are oil free that are great for oily skin. They are also a range of coverages from light that is good for a more natural look or a full coverage that is good for covering problematic skin. You might have to do a little research to find a foundation that will work well with your skin type. I like to look up reviews to see what people with similar skin have to say about the product. If you are worried about finding a color that matches, stores like Ulta and Sephora will help you find the right color. 

There are a number of ways to apply liquid foundation. A foundation brush or a Kabuki brush will provide a medium- full coverage. A sponge will create a lighter, airbrushed look. A sponge is my favorite way to apply foundation. If you want to see a more detailed way to use a sponge click here. After application, setting the foundation with a translucent powder will help it will stay put longer and will prevent shine.
 

Cream/ Whipped Foundation: These tend to be more on the heavier side, so they provide full coverage. Because of the formula, they are better for dry/normal skin. They can be applied the same way a liquid foundation is applied: Foundation brush, Kabuki brush, Sponge. It is also a good idea to set the foundation with a translucent powder.

Stick Foundation: I really like stick foundations. They are quick and easy to use and are great for traveling or applying on the go. When I use a stick foundation I apply it directly to my skin. I put a small amount on my cheeks, forehead and chin and then use my fingers to blend it all in. You could also use a brush or a sponge to blend it. These typically provide a medium coverage. Again, I recommend setting it with a translucent powder.

Mineral Powder: This is a loose powder that provides a light, natural coverage. The coverage can be built up with a couple of layer though. It is perfect if you are just starting to wear makeup or if you want to go for a "no makeup" look. A downside is that it can look cakey if too much is used or if it is not buffed into the skin. 
There are mineral powders targeted towards normal skin and matte ones for more oily skin. The best way to apply it is to use a kabuki brush or a big fluffy brush. Dip the brush into the powder and then tap off any excess. Apply it in small circular motions to buff the product into your skin.These typically don't last as long as other foundations do.

Pressed Powder: This will provide minimal coverage, but will take away shine when used on its own. It can also be used to set a liquid, cream or stick foundation, although I would recommend a translucent powder for setting instead.

Tips:
-Wash your face before applying any makeup to have a "clean canvas" to work on. Makeup will go on smoother. 
-Before applying foundation make sure to use a moisturizer, even if you have oily skin. 
-Many foundations have SPF in them. If you plan on being outside this can give you a little bit of extra protection. 
-When looking for the perfect shade of foundation, match the color to your neck instead of the inside of your arm. It will look more natural when it blends into your neck. 

What is your favorite kind of foundation?
Thanks for visiting!
 

Thursday, December 26, 2013

Makeup Brushes For Beginners

Hello Everyone! When first learning to do makeup it can be hard to decide what products and brushes to get. If you want to see my recommendations for a beginning makeup kit click here. After deciding what products you want to start using, finding good brushes will help you apply and blend the makeup evenly.

Face:
-Blending Sponge- Obviously this isn't a brush, but I wanted to add it anyways. It is a lot easier to use to apply liquid foundation than a foundation brush. It leaves a light, natural looking finish, so it is great for beginners.
-Powder Brush- Powder should be used after foundation to help set it and keep it in place all day. It is especially good to use if you have combination/oily skin. A powder brush is a big, fluffy brush that allows you to lightly apply powder.
-Blush Brush- If you are wearing any kind of foundation or powder, blush is important to use. Faces are naturally not one color, so adding blush and/or bronzer helps create dimension and make your face look more natural.
-Kabuki Brush-This is a great multifunctional brush. It can be used to apply foundation by buffing the product into the skin. It can also be used to apply bronzer.
Eyes:
-Eyeshadow Brush- This is used to apply eyeshadow all over your  lid. 
-Blending Eyeshadow Brush- After applying eyeshadow to your lid, a blending brush can be used to apply a darker color to the crease of your eye. 
-Angled Eyeliner Brush- If you plan on using gel eyeliner an  angled brush is needed. I also use one to fill in my eyebrows.

Brushes:
Brushes can be expensive and when first starting there is no need to spend a ton of money. These are 3 brands that I use and think are good quality. 
EcoTools
-Ecotools: These are environmentally friendly face and eye brushes. A brush prices range anywhere from $4-$10 for a single brush. They also have kits that range from $8 to $14. I haven't had any issues with these brushes shedding or breaking, even after washing them. The brushes are really soft too.
-Real Techniques: These brushes are my favorite. They are also soft and don't shed. The come in really pretty colors too. They are a little bit more expensive than Ecotools though. They are around $10 for a face brush, and around $6 for an eye brush. They also come in kits though for about $20.
-E.L.F.: I haven't had any of these brushes shed, but I have had a one fall apart. They are $1 of the regular brushes, or they have professional ones for $3. For the price, these brushes are pretty good. I like the eye brushes better than the face ones. 

I finally got a twitter! If you want to know when new posts go up click here
Thanks for visiting!

Sunday, December 22, 2013

All Things Leopard

I don't know about you, but I have been loving animal print lately, especially Leopard. I like to wear a solid colored shirt with jeans and add a pop of leopard, usually with a scarf or shoes. I found some other cute, random leopard items I thought would be fun to add to an outfit.


1. Sally Hansen Effects Real Nail Polish Strips in Kitty Kitty. You can get these from most drugstores or you can see how to paint your nails in leopard print here.
2. Leopard Trim Envelope Clutch- From Charlotte Russe 24.99 This would look really nice with a little black dress.
3. Candies Leopard Backpack- From Kohls $29.99
4. Luxe Velveteen Leopard Skinny Jeans from Forever 21-$24.80 I like that these jeans are subtle with the print. A lot of the other jeans and leggings I found were bright with traditional leopard colors.
5.Malindi Leopard Loop Scarf from Francesca's- 24.00 I like the unique colors of this scarf.
6. Converse Sneakers- From Journey's $54.99
7. Leopard Mirror Compact from Ulta- $9.99 I know you can't "add this to an outfit," but I thought it was too cute to not add. I have been eying this guy at Ulta for a couple of month now, I just haven't gotten it yet.

What trends have you been loving lately?
Thanks for visiting!


Thursday, December 19, 2013

Snowflake Nails

Hello! I wanted to do something a little bit different with my nails. I saw cute snowflake nails on pinterest so I did something similar, but put my own spin on it. I started by painting them with OPI's Ski Teal We Drop. I've talked about this color a few times on my blog, but it is one of my favorites! I then painted my index and ring finger with Orly's Halo. It is a beautiful gold glitter. I have been loving this polish for winter.

OPI Ski Teal We Drop
I started by making a small dot off the the side of my nail. I then drew 5 straight lines from the dot with Orly's White Tips polish. I used a nail art brush to make all of the lines. I then drew 2 short lines diagonally from each of the original lines. I didn't show this in the picture, but I then made dots around the finished snowflake for smaller snowflakes.
 On my thumb nail I drew 3 lines from the side of my nail. I then drew 2 short lines diagonally from each of the 3 longer lines. Afterwards I made small dots for snowflakes.
I finished with Essie top coat.
I hope you guys like this look. 
Thanks for visiting!


Wednesday, December 18, 2013

Urban Decay Naked 3 Look 1

Hello! I hope everyone's week is going good. My wonderful husband got Urban Decays Naked 3 Palette for me for Christmas. Since he picked his gift out and got it early, he gave me this early too. I can't even tell you how excited I was. I have been using Naked 1 for years and have loved it. I skipped on getting Naked 2 because a lot of the colors were similar. I did however want the 3rd because there are so many great colors. This palette has more pink/rose colors with some of them having shimmer, while some are matte.

Step 1: Apply a primer or a base. I like to use Maybelline's Color Tattoo Metal in Inked in Pink. It is a cream shadow that creates a nice base and intensifies the pink colors in this look.
Step 2: Apply Burnout to your entire lid.

Step 3: Apply limit to your crease and blend upwards. This color is very similar to Burnout, with no shimmer. Blend it slightly upward and out.
Step 4: Apply Liar to the outer 'V'
Step 5: Apply Eyeliner and Mascara.

I hope you guys like this look. I plan on doing a few more from this palette.


Wednesday, December 11, 2013

The Eyebrow Difference

Hello Ladies! I hope everyone is doing well. It has been really cold and snowing for the past couple of days here in Michigan. I have been spending a lot of time cuddling with a blanket and hot chocolate while studying.  On a more positive note the semester is almost over.  Today I wanted to share my eyebrow routine. Eyebrows make a huge difference! I use NYX Eyebrow Cake Powder in dark brown/brown. It comes with an eyebrow gel and a small brush. I don't use the gel and use an angled brush by EcoTools. The color matches pretty well, but I could have probably used a shade lighter.  There are 6 other colors to choose from for blonde, red or black hair. If you have blonde hair you want to choose a color that is a shade darker than your hair and if you have dark hair you want to choose a color that is a shade lighter than your hair.


BEFORE                                                                                                          AFTER
I know you can't see a huge difference in the pictures, but there is. My eyebrows look a little bit thicker and more full. I start by outlining my eyebrows with the darker color using the angled brush. The line may look a little bit harsh but we will fix that later. I then take the lighter color and fill in the end of my eyebrow by making short, horizontal strokes. With the remaining product on the brush I fill in the inner part. I take the brush and make short, upwards strokes. I then use an eyebrow brush and smooth out any harsh lines and blend any parts that need blending. I normally don't use the gel, but if your brows are hard to keep in place the gel is helpful. You can also use clear mascara to tame them. I like Maybelline Great Lashes clear mascara. You can just use the mascara brush, so it is easy to use.
I hope that these directions are easy to understand. Let me know if you want to see how I shape them. 
thanks for visiting!


Tuesday, December 10, 2013

Beauty Gift Guide

Can you believe Christmas is only 2 weeks away?! Today I wanted to share some beauty gift ideas. There are so many great gift sets around the holidays. I picked out some of my favorites.


1. Lorac Solid Gold Eye Shadow Palette
$12 from Ulta

2. Tarte 8 piece lip surgence lip set
$34 from Tartecosmetics.com

3. Benefit Sexy Little Stowaways set- Comes with travel sizes of It's Potent! brightening eye cream, the POREfessional balm, Hoola Bronzer, Badgal Lash Mascara, Stay Don't Stray concealer and eyeshadow primer, ooh la lift under-eye brightener, Chachatint lip and cheek stain, Sun Beam golden bronze highlighter, Bella Bamba 3D brightening pink face powder, That Gal brightening face primer.
$34 on Benefitcosmetics.com

 4. Beauty Blogger Darlings by Too Faced- Comes with travel sizes of Bronzer in Chocolate Soleil Bronzer, Primed and Poreless Face Primer, Better than Sex Mascara and Shadow Insurance Eye Shadow Primer
$20 From Sephora 

5. Tarte Thoughtful Treasures Best-Seller Set- Comes with Deluxe travel sizes of Maracuja oil, Amazonial Clay 12-hour blush in the color thankful (golden pink) and LipSurgence Lip tint in energy
$19 from Tartecosmetics.com

6. Philosophy The Holiday Handbook Set- Comes with 3 1oz Hand Creams in the Scents Homemade Honey Buns, Spiced Gingerbread Cookie, Cranberry Medley
$20 from Sephora

7. OPI Cheers to the Holdays- 4 piece mini set 
$12.95 from Ulta

Thanks for visiting!!


Sunday, December 1, 2013

Cyber Monday Beauty Deal

Hello! Did you ladies get a lot of shopping done on Black Friday? My husband and I went out for a few Christmas gifts, but that's about all. I definitely prefer to shop online if possible. If you missed out on the sales on Friday, Cyber Monday starts tomorrow! I found some good beauty deals.


Ulta- Sales are only Monday online. I listed some of my favorite sale items, but if you want to see the ad, click here.
  • 30% off the entire line of Real Techniques Brushes
  • 25% off Body Shop products (excludes sets)
  • $19 Tarte Balanced & Beauty Kit ($62 value)
  • BOGO on Not Your Mothers Hair Products
  • 30% off TIGI Haircare Products
  • $79.95 Holiday Ultra Chi Flat Iron (Reg. $149.95)  
 Sephora- This sale is going on right now for a limited time. If you want to see all of the deals, click here.
  • $19 Smashbox Softbox II Photo Op Eye Shadow Palette. (Reg. $39) Palette with 6 neutral colored eyeshadows. 
  • $5 Sephora Collection Waterproof Smoky Cream Liner (Reg. $12) Comes in 4 different colors.
  • $39 Too Faced Loves Sephora 15 Years of Beauty Palette.(Reg. $52) Palette with 10 Eyeshadows, Blush in the color "Who's Your Poppy?," Bronzer in "Chocolate Soleil and Sun Bunny, Shadow Insurance Anti-Crease Eye Shadow Primer and Flatbuki Brush.
  • $10 Tarte Little Miracles Best-Selling Essentials. ($28 value) Comes with a trial size of Smooth Operator Amazonian Clay Finishing Powder, Pure Maracuja Oil, Lights Camera Lashes 4-in-1 Mascara.
Yes To- This is a sale is on Monday for only 2 hours from 12pm-2pm EST. For the website click here.
Sigma- 20% off select products. Use code: CM2013

E.L.F.- 50% off everything when you spend $30 or more by 12/2. Use code: Cyber50

Tarte- 25% off. Use Code: Turkey. This sale is only good through Sunday, 12/1. I'm not sure if they are having a sale starting tomorrow.

Bobbi Brown- Free Shipping & 5 samples with any order.

I hope that you found this helpful. If you know any deals that I missed please leave them in the comment sections.
Thanks for visiting!

Thursday, November 28, 2013

Give Thanks!

Happy Thanksgiving!!

I am headed to my aunt and uncles today, but I wanted to get a quick post up on a few things I am grateful for. 

1. God's Love
2. My best friend
3. My family 
 (It is only a few of the people I am thankful for)
My parents and my husband and I
4. My 3 furry boys
Toby, Mister, Thor
5. Good Friends
6. Our House
It was truly a blessing that we were able to purchase a home. We had only a few months to find a new place after the house we had been renting was zoned commercial to be torn down.


What are you all thankful for today?


Wednesday, November 27, 2013

All About Beauty Sponges

Hello Ladies!
A beauty sponge is one of my favorite ways to apply Foundation. It leaves a flawless, airbrushed finish and is so easy to use. I use a Sonia Kashuk Blending Sponge from Target. I'm sure you can find similar ones at any drugstore though. I haven't tried a beauty blender yet, so I can't compare the two. I wanted to share how I use and clean it.
Sonia Kashuk Blending Sponge
I start by dampening the sponge to prevent it from soaking up too much foundation. I find that it wastes a lot of product if I don't. I then dot the foundation all over, towards the inner parts of my face. I am using Covergirl's 3-in-1 foundation here.


I then take the sponge and blend the foundation outwards. Dotting it towards the center of your face, then blending it out helps prevent harsh makeup lines around your face. Once I feel like it is all blended into my skin I apply a concealer under my eyes and to any blemishes. The tip of the sponge is perfect for applying concealer. I always set it with a translucent powder.


This is the finished look after applying blush and eye makeup. 

Cleaning the Sponge
I always rinse the sponge before I use it each time and I try to clean it about once a week. I use baby shampoo and put a quarter sized amount on the palm of my hand. I roll the sponge around on it and then rinse it under hot water continually squeezing out the water until it is clean. If its not looking as clean as I like I will use more of the baby shampoo. I clean my makeup brush a similar way. If you want to see click here.

Thanks for visiting!!


Tuesday, November 26, 2013

Maybelline Fit Me Foundation Stick Review

In my October favorites post I said that I would do a review on Maybelline's Fit Me Foundation Stick. Better late than never right?! I have mixed feelings about this product. When I first tried it I really liked it. It goes on very smooth and looks natural. It is light to medium coverage and I use a concealer for under my eyes and any blemishes. I also set it all with a powder. After I used it for a little while I noticed that my face was becoming dry. This is odd for me because my skin is normally very oily. I continued to use the foundation with a different moisturizer though. My face has been less dry, so it seemed to help. 
Application: The stick makes it easy to apply. I put the product directly on my face then use either a brush or my fingers to blend it out. It lasts for the entire day, but I normally touch it up if I go out at night.

Color: It comes in 12 different colors with a wide range of colors. I think this is the first foundation that I have tried where the color matches almost perfectly to my skin tone. I use 120 classic ivory.

Price: $6.99 

I would give this product 3 out of 5 stars. I'm not sure that I will buy it again after this one runs out. It is shine-free so it is good for oily skin, but I think it will be too drying for those of you with dry skin. I'm thinking about trying Loreal's Magic Nude Liquid Powder next. Have any of you tried it?
Thanks for visiting!!


Sunday, November 24, 2013

Winter Essentials

Hello everyone!
I'm sorry for the lack of posts lately. My husband and I just moved into our house and are still trying to get settled in. I am so tired of seeing boxes! On top of that its close to the end of the semester so I have a ton of things to get done for school. It recently got really cold here in Michigan, so I thought I would do a post on my winter essentials.

1. Mossimo Supply Co. Open Cocoon Cardigan- I love cardigans to dress an outfit up or even for more casual looks. I am always cold in the winter and these are nice to throw over any top.  This one is from Target and it comes in quite a few different colors too. If you can't tell I prefer neutral colors and black/ grays.
2. Infinity Scarves- I had to add some color to my list. This infinity scarf is from Francesca's. These are nice to bundle up with for those long walks to class. And its super cute!
3. Rose Salve C.o Bigelow- I have mentioned this product before, but it is one of my favorite lip products. My lips get so dry, especially in the winter, but this product helps them from cracking. If you want to see a full review on this product click here.
4. Lush Lip Scrub- To go along with the Rose Salve, I like to use a lip scrub. This helps get rid of any dry skin and its bubble gum flavored! It helps lipstick go on smoother too.
5. Sweaters- Like I said before I am always cold in the winter. Sweaters are an awesome way to stay warm, but still look cute. This one is from H&M.
6. Mittens- These mittens are from American Eagle. I like that the top part flips up so I don't have to take it off to grab something.
7. Nail polish- This color is Ski Teal We Drop by OPI. It is a dark blue color that is perfect for winter.
8. Boots- I pretty much live in these boot by Madden Girl. They look great with just about anything and are comfy too. They are from Famous Footwear

What are some of your winter essentials?
Thanks for visiting!

Tuesday, November 12, 2013

Best Inexpensive Teeth Whitener

Hey!
Today I wanted to share my favorite inexpensive teeth whitening product. It is the Plus White 5 Minute Premier Speed Whitening Gel. I have been using this product for years with great results.
I just purchased my third tube of it after noticing my teeth aren't as white as they could be. There was a small difference after the first time using it. It is a gradual process though, but after a couple of weeks there should be a pretty noticeable difference. Once you see the results you want, you can continue to use it once or twice a week to maintain the color.

The directions say to use apply it with a cotton swab, use a mouth tray or with a toothbrush.
I like to apply this twice a day with a cotton swab and let it sit for about 10 minutes. I always brush my teeth before and after the treatment. If you prefer a mouth tray, they do sell a kit that includes one. I'm not sure how much more it costs though. Or you can just get a .99 cent mouth guard from the sports section and use that.

Price:4.97 at Walmart

This product may not give you the same results as a dentist, but its pretty good for $5. I would definitely recommend this product to anyone looking for an inexpensive way to whiten teeth.
Thanks for visiting!
Kelly