Pages

Friday, August 30, 2013

Tips to Make Nail Polish Last Longer

Hello! I hate when I take the time to paint my nails and then the next day they chip. These are some of the tips and tricks I have learned to help nail polish last longer.
                                                     Essie: First Timer, Essie All in One 3-Way Glaze

Step 1: Before applying any polish, use a nail polish remover or rubbing alcohol to remove any oils on your nails. 
Step 2: Use a base coat. The will prevent your nails from become stained by dark polish and will help nail polish last longer.
Step 3: Apply multiple thin coats of nail polish, instead of one thick coat. 
Step 4: Let each coat dry completely before applying the next coat to prevent bubbles.
Step 5: Finish with a thin layer of top coat. Apply it around the tip of your nail and under, to protect the ends from chipping (pictured below)


     Additional Tips:
    • Avoid soaking your hands in water.
    • Every day or every other day, reapply a top coat.
    • Find a quality top coat. I have tried many and it really makes a difference! This is the first time I have used Essie's All-in One 3-Way Glaze Top Coat. I like it so far, but I will do a review after I use it a couple of times.
    • Instead of shaking the nail polish, roll the bottle between your hands. This helps prevent air bubbles from forming.
    Thanks for visiting! 
    Kelly 

    Wednesday, August 28, 2013

    How to Apply Foundation

    Prepping your skin: Before applying foundation, make sure you start with a clean "canvas" by washing your face with your favorite face wash. The next step is to apply a toner which is optional. Toners help to restore the pH balance of skin that cleansers and scrubs can disrupt. I recommend using an alcohol free toner to prevent drying your skin out. Next is to apply a moisturizer. This is important even if you have oily skin, like me. I have tried a lot of oil-free moisturizers but my favorite is Clinique Dramatically Different Moisturizing Gel. It is very light on my skin and it does not leave my skin feeling oily. Another optional step is to apply primer. This can help to make your makeup last longer, it minimizes pores and it even out your skin tone.

    Applying Foundation:There are a few different ways to apply foundation:

    • Foundation Brush
    • Sponge/ Beauty Blender
    • Flat Top Kabuki Brush
    • Fingers
    With the first 3 methods you can either dot the foundation onto your forehead, nose, cheeks and chin and then use the brush to blend it out. Or you can apply the foundation to the back of your hand and dip the brush lightly into it and apply to your face. You want to make sure you are always working for the inner parts of your face and working it out. This prevents the dreaded makeup line around your face.


    Method 1: Foundation Brush
    Using the wide side of the brush start making downward and outward strokes. Making small 'x' motions can help blend it in also. Use the skinny edge to apply the foundation to the sides of your nose. It takes some practice using this brush, but when you get the hang of it, it is easy to do without streaks. This method is nice because it can be used for a light or full coverage depending on how much foundation you use.
    There is also a concealer brush that looks like this foundation brush, but is smaller that can be used to apply concealer under the eyes and to blemishes.


    Method 2:  Flat Top Kabuki Brush
    A flat top brush is a very dense brush that tends to apply the foundation thicker then other methods. Again, you can either dot the foundation on your face, or dip the brush into foundation that is on the back of your hand. Using small, circular motions, buff the product into your skin working from the inner part of your face, out. This creates a flawless, airbrushed look.

    Method 3: Sponges and Beauty Blender
    Sponges and the Beauty Blender leave the skin with a nice, dewy look. It gives a more natural finish and can be quite sheer, almost like a tinted moisturizer. To apply use the wide part of the sponge to apply the foundation to your entire face, then us the small edge to blend it into the sides of your nose and around your eyes. Sponges tend to soak up a lot of the product, but if you dampen it before use, it can help prevent it. This is not the method to use if you want a full coverage application.


    Method 4: Fingers
    This method is quick, easy and cheap. Before you start, make sure your hands are clean. You don't want to spread dirt and bacteria on your face. I dispense 1 pump of foundation onto the tips of my fingers. I blend it between my hands to warm it up and then I apply it to my face. Like the other methods I start in the center of my face and work outwards. I then like to use a stippling brush (like a flat top kabuki brush, but a lot less dense.) I make sure it is all blended into my skin by making small circular motions with the brush.

    Final Touches:The final step is to apply concealer and to set your foundation. I apply concealer underneath my eyes and on any blemishes I have. I make sure it is blended well using my fingers or the beauty blender. I then take a translucent powder and a powder brush to set my foundation. I put a small amount of powder on the brush and then make small circular motions with the brush. I apply it this way to prevent smudging any foundation or concealer. If you have dry skin you can either skip the powder, or only apply it to your t-zone.
    Apply some blush and eye makeup, and your face is ready to go!


    • A tip for anyone with oily skin is to take a tissue (without lotion) and peel it into the 2 pieces. After you apply your liquid foundation take one of the thin pieces of tissue and blot your face. This gets rid of any excess oil from the makeup. 
    Thanks for visiting! 
    Kelly

    Tuesday, August 27, 2013

    C.O. Bigelow Rose Salve Review

    Hello! 
    I recently re-discovered this product and am wondering why I ever stopped using it. It is an all-purpose product and says it can be used on the face, cuticles, elbows, knees and any other dry, chapped skin. I normally only use it on my lips though because it is somewhat greasy on skin unless it is rubbed in really well. It leaves my lips feeling moisturized and soft and a leaves a nice glossy finish that is not overly shiny. My lips get really chapped, especially in the winter and this product really helps minimize that. It seals in the moisture well. It is not tested on animals which is always a plus.


    Smell: It is hard to describe the smell, but it is subtle and it is not overwhelming.
    Packaging: The packaging is cute, but I don't like that it is in a tin and can be unsanitary. I try to use it only after I was my hands so I'm not spreading germs in it. 
    Price: I got this product at Bath and Body Works for $5.50. It is 0.8 oz, so it is fairly big and lasts a long time, so I think the price is worth it.

    Thanks for visiting!!
    xo, Kelly

    Thursday, August 22, 2013

    My Favorite Hair Care Products

    Today I wanted to share some of my favorite hair care products with you. I recently cut my hair a little past my shoulders and use a flat iron more than I probably should. Making sure my hair is protected and moisturized is very important. These are the products I have found that work well for my hair.


    Moroccan Oil- I have curly hair that tends to be very dry, especially during the winter months. About two years ago I cut 8 inches off my hair, to my shoulders. I straightened it every day for about 6 months. My hair became very damaged and brittle from the constant heat. I put one pump on the ends of my towel dried hair. I have noticed a huge difference in the health of my hair. It leaves it shiny and helps to control some of the frizz. You want to avoid putting this product on your scalp and avoid using too much product, because it will leave your hair looking greasy. This is a great product to restore life to damaged, over-processed hair. It comes in an original formula for normal to thick hair and a light formula for thinner hair.


    Macadamia Deep Repair Mask- I love using this product to add moisture back to my hair. The directions say to use it on clean, wet hair and leave it on for up to 7 minutes, no more than twice a week. I try to use this product once a week and replace my conditioner with this product on those days. I usually use it in the shower and leave it on my hair for a few minutes, but if I have the time I will leave it on for longer. If I leave it on longer I will wash my hair in the sink and apply the mask. Then I wrap my hair in a towel (or you can use a shower cap) and leave it on for around an hour. This product leaves my hair shiny and soft and also helps with frizz. I love the smell of this product too! I would not recommend using this product every day because it may weigh down your hair and because of the intensity it may cause more damage then good.


    Dry Shampoo- Dry shampoo is a great product to refresh your hair. It comes in a aerosol can or a powdered form and it is used to soak up dirt and oil. Apply a small amount onto your scalp and then brush the product out. I only wash my hair every other day, but by the second day my roots are oily. I spray it only through my roots and it makes my hair look and feel clean. It also adds extra volume.

     
    Clarifying Shampoo-
    Clarifying shampoo is important to get all of the build-up out of hair. Using gel, hairspray etc. causes build-up over time and can weigh hair down and make it feel greasy. Clarifying shampoos should not be used on a daily basis because they can be harsh on hair. I use it about 1-2 times a month, when my hair feels like it needs it. I start by putting a small amount in the tips of my fingers and work it through my scalp. I apply more as needed until my whole scalp is lathered. I do not apply any directly to my ends, because it is drying. Make sure to rinse well and apply a good conditioner or a deep conditioner after.


    Coconut Oil- Coconut oil is another product that works wonders for damaged hair. Coconut oil has a small molecular structure that freely soaks into the hair. It comes in a semi-solid form, but when heated it turns to a liquid. I warm it up in my hands and apply it to my hair and massage it into my scalp. I do this at night and wash it out after an hour. It can be hard to wash out, so it is good to wash with shampoo twice. Coconut oil strengthens hair, adds shine and moisture. I like this because it is not like hair products with a ton of additives.


    Tresemme Thermal Creations Heat Tamer- When using heat on your hair you want to make sure you use a good heat protectant. This helps to prevent heat damage from straighteners, blow dryers and curling irons. Tresemme Thermal Creations can be found in drugstores. The bottle has a nice design and sprays evenly. I spray it on wet hair before I blow dry my hair and it leaves my hair feeling soft. It doesn't leave my hair feeling sticky like some heat protectants I have tried.


    DevaCurl Light Defining Gel- This product is obviously only for those of you with curly hair. I love this gel and use it on a daily basis. It is lightweight and doesn't leave my hair feeling crunchy. It separates my curls and defines them. I put this product in my hair when it is damp and I scrunch my hair. Once my hair dries, I always use a product to reduce the frizz.


    What are some of your favorite hair care products?
    Thanks for visiting!
    Kelly

    Monday, August 19, 2013

    How to Find Discounted High-End Makeup


    Makeup from a counter can be expensive. I know that I have a hard time spending 25 dollars on a concealer unless I have tried it before and know that it is worth the price. Luckily, there are some ways to get the same products for less. 

    Amazon and Ebay
    Amazon.com and Ebay.com can be good places to find discounted makeup. It can sometimes be a hit or miss, but I have found items for a significantly lower price. Before ordering anything from these websites, it is important to make sure that the item is authentic. Some of these sellers sell fake makeup with a high end name on it. If it is the first time making a purchase from a seller I always read the comments and make sure that they have good reviews and nobody mentions that the product they purchased is not authentic.

    HSN and QVC 
    Often times these websites will sell items individually for a small discount, or sometimes they will sell bundles which seem to be a better deal. A downfall is that there is only a smaller selection of brands on these websites. Sometimes they will have items that are on a special sale so its good to check regularly for those.
    Allcosmeticwholesale.com 
    This website sells authentic beauty products, but it can also be a hit or miss. Some products are well priced, but some are only a couple dollars cheaper than the stores. A downside to this website is they don't usually have newly released products. Before making a purchase it is important to read the descriptions because some products have damaged packaging or the product itself is damaged.
        Sign up for Emails
        High-end makeup websites usually have newsletters you can sign up for to get emailed 
        about new products, makeup tips and sales they are having. Sometimes they will have 
        percentage off sales on the entire website, and sometimes they will have certain items on 
        sale or on clearance. Some good websites I have found for sales are:
    • Urbandecay.com
    • Tarte.com
    • Purminerals.com
       Sephora.com and Ulta.com are also good websites to find deals.
       Hautelook.com
       Hautelook.com is a website that constantly has different thing for sale.You will need to sign 
       up to have access to the website though. When you sign up, you will get a daily email with 
       items that are available. Not only do they sell beauty products, but they also have clothing, 
       household items and a section for men and children. Some brands I have seen on this 
       website are:

    • Urban Decay
    • Cargo
    • Lorac                                                                                                                                                                                       

    Thanks for visiting!


    Monday, August 12, 2013

    How to Use Dry Shampoo

    What does Dry Shampoo do?
    Dry shampoo is a way to freshen your hair without using water. It is a powder that allows you to go longer in between washes, because it soaks up oil and dirt. It comes in two forms: loose powder and an aerosol can. I prefer the aerosol can because loose powder can be messy and I feel that a lot of product gets wasted.

    Easy Way to Use Dry Shampoo: 
    1. Since hair is more oily at the roots, start by parting hair on one side of your head and lightly spray the dry shampoo about 8 inches away from your head. Continue to part your hair until you reach the other side, each time giving it a light spray. Flip your hair upside down and spray the bottom of your hair. It is important to only spray lightly because applying too much can make your hair look white, especially for darker hair.
    2. Gently massage the dry shampoo into your scalp.
    3. If you have straight hair use a comb to brush the dry shampoo out. If you have curly hair like me, flip your hair upside down and run your fingers through your roots to get the excess product out.

    Why Use Dry Shampoo?
    • Dry shampoos are great because they freshen hair in a couple of minutes without having to take the time to wash, dry and style.
    • Washing your hair daily is damaging and strips your hair of natural oils, but using a dry shampoo allows you to go longer without washing your hair with regular shampoo.
    • Dry shampoo can add volume to hair. After spraying dry shampoo on hair use a blow dryer on your roots to create volume. You can even do this when you hair is clean if you want more volume.


    I have tried a few high end and drugstore dry shampoos and Suave is my favorite. I have dark brown hair and as long as I don't spray to much in one spot, or spray to closely to my hair, it doesn't leave white residue on my hair. It is not sticky like other dry shampoos either. It does have a strong citrus smell though. I like the smell, but it may be too strong for some.
    This is also cheap which is always good. It is about 3-4 dollars at the drugstore.


    Another one of my favorite dry shampoos is the Batiste Dry Shampoo. There is a wide variety of scents as well as ones with a hint of color for medium/ brunette hair as well as dark and deep brown to prevent your roots from having the white residue. I have only tried the original one and it smells good and is not too strong. I also found that I needed to spray it carefully to not make my roots look white. This product is a little bit more expensive then the Suave Dry Shampoo. It was about 8 dollars at the drugstore.


    Thanks for visiting!
    xo, 
        Kelly

    Saturday, August 10, 2013

    How to Make Eyes Look Bigger


    Hello! Brightening and making my eye look bigger is one of my favorite things to do with makeup. Here are the things I do to achieve the look.

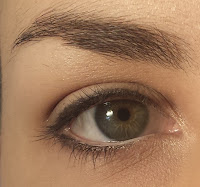
    1. Start by applying eyeshadow. I chose to keep it simple by applying a skin-toned color all over my lid, then using a slightly darker color in my crease. Afterwards apply a thin layer of eyeliner to your top lid to help define your eyes.

     2. Use a white or off-white colored eyeliner on your waterline to brighten your eye. Dark colors will close your eye off and make it appear smaller.

    3. Instead of applying a dark color to your waterline, apply it to your lash line. Only put it on a 1/2 of your eye though. Applying it to the entire eye will close your eye off and make it appear smaller.

      4. Add a subtle highlight to the inner corner of the eye and to your brow bone to brighten.


     5. Add mascara for the finishing touch.

    I hope these tips help. 
    thanks for visiting! 
    Kelly 


    Monday, August 5, 2013

    Leopard Nail Design

     Materials Used:
    Essie in Tart Deco (Coral)
    Sally Hansen Hard as Nails (White)
    Color Club- Nail Art (Black)
    Sally Hansen No Chip Acrylic Top Coat

     Step 1: Paint each nail a solid color. I chose to only do leopard print on my ring finger as an accent nail, so I painted it white, and the rest with the coral color. Let the polish dry before moving to the next step.

    Step 2: Once the nail polish has dried, use the nail polish brush to dot spots on your nail. Make sure there is not too much nail polish on the brush to prevent thick spots that won't dry. The spots should slightly vary in size and shape. Some spots can go to the cuticle or off the tip of the nail too. Let the spots dry for a few minutes before moving to the next step.

     Step 3: After a few minutes, take the black nail art polish and outline the spots. Some can be fully outlining the spot, some can be a 'c' shape around it, and some spots can have multiple gaps in the outline. After the spots have had time to dry, finish with a top coat. Be sure to give it enough time to dry before applying the top coat or it will smear. 

    Remember that the spots and outlines don't have to be perfect. I think that they actually look a little bit better when they are a little messy. I hope you guys like this design.

    Thanks for looking!! 

    Kelly